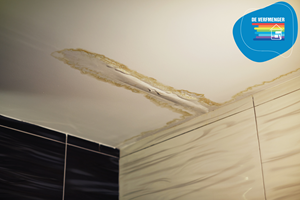
Roof Leaks
Are you dealing with a leaking roof? That’s unfortunate! Fortunately, you can easily fix this yourself. Roof leakage is an issue that needs to be addressed as quickly as possible. By fixing roof leaks promptly, you can prevent damp spots or worse, wood rot! Do you have a leak? Grab a brush and repair your roof quickly!

Tip from the Paint Expert
Do you experience leaks depending on the wind direction? This could mean the rain is getting under the roof covering with certain winds. You can prevent this by applying roof coating to seal the edges of the roof as well.
How to Locate Roof Leaks
Before you can fix a leaking roof, you first need to locate the source of the leak. Look for areas where water is pooling on the roof, or look inside for signs of damp spots. If you have a pitched roof, check the condition of the roof tiles and look for any gaps. Porous tiles or worn roof coverings can also be the cause of roof leaks.
What Are the Causes of Roof Leaks?
Roof leaks are a frustrating issue, often noticed only when damage becomes visible. Damp spots on the roof are a common indicator. Leaks usually occur due to ageing or poorly maintained roof coverings, whether tiles or roofing felt. Roofing felt can become porous due to UV exposure and may start leaking. It can also loosen partially due to wear and tear. Once the roofing material is no longer in optimal condition, rainwater can seep through and cause leaks.
Leaks in Roof Flashing
Leaks can also occur even when roofing felt or tiles are in good condition. This is often due to gaps in the roof flashing. Flashing is commonly found at corners, around windows, or at roof elevations. It is water-resistant and provides excellent protection against water seepage. Checking the condition of the flashing is always a good idea!
Roof Coating
Leaks in the roof can be effectively repaired with roof coating. This coating is applied over the existing roof covering. Many people think this is a difficult task, but it’s much easier than you might expect. DIYers can easily coat their roofs to fix leaks! Roof coating can be applied with a broom or a block brush. Once dry, it forms a UV-resistant, waterproof layer, providing extra protection against weather elements and extending the durability of your roof covering.

Did You Know...
Did you know that applying a coating to a flat roof not only prevents or repairs leaks but also extends the overall life of the roof covering? With a roof coating, you can extend the lifespan by up to three years!
How to Fix Roof Leaks
Once you’ve located the leak, it’s time to seal it! Use roof coating to fix the issue. There are various coatings available for different applications, but they all serve the same purpose—to repair leaks and prevent new ones.
Roof Coating
After locating the source of the leak, it’s essential to fix it using roof coating. This type of coating is specially formulated to adhere to bitumen-based surfaces, providing waterproof and UV-resistant protection. These attributes are crucial for roofs, as roof coating can extend the lifespan of the covering by up to three years and prevent further leaks. While coating your roof may seem challenging, it’s a task that handy DIYers can easily handle. By doing it yourself, you not only stop the leak but also save on the costs of hiring a professional!
Advantages of Roof Coating
Roof coating offers numerous benefits, making it a popular choice among professionals and DIYers. Here are some of its key advantages:
- Extends lifespan
- Prevents leaks
- Protects against UV rays
- Easy to apply
- Limited colour options
Consequences of Roof Leaks
Roof leaks should be addressed promptly. Left untreated, they can lead to serious issues and even damage your home’s structure. Moisture can cause wood rot, potentially compromising load-bearing beams and risking the stability of your home. Additionally, water intrusion can lead to mould growth, which poses health risks. Take swift action to avoid further complications!
Step-by-Step Guide to Fixing Roof Leaks
Want to coat your roof yourself? Here’s how:
Step 1. Locate the Leak
The first step is finding the source of the leak. Check for damp spots inside, as well as cracks, gaps, or pooling water on the roof.
Step 2. Prepare the Area
Once the leak is found, clean the area thoroughly. Use a brush or pressure washer to remove moss, algae, and leaves.
Step 3. Apply Roof Coating
When the surface is fully prepared and dry, start applying roof coating. Depending on your project’s size and complexity, use a brush or roller. Ensure even, overlapping strokes for a smooth finish.
Step 4. Repair Water Damage
Allow the coating to dry completely after application. Follow the packaging instructions for recommended drying times. Note that roof coating may take longer to cure fully. Avoid walking on or stressing the surface until the coating is entirely set for the best results.
If you’re unsure which roof coating is right for your project or need advice on painting supplies, our paint experts are here to help. Call our customer service at 058-2152530, email info@verfmenger.com, or visit our customer service page.

Paint Expert Author
Marco is the go-to expert for hammer-finish paint. With years of experience in the paint industry, he has extensive knowledge of everything from paint colours to products. Marco is highly qualified, boasting over 20 years of experience and certifications from the Sikkens Academy.


